FIELD NOTES
Your First 10 Trips with an Underwater Fishing Camera: A Beginner's Guide
You have the camera. It is sitting on your desk or kitchen table, still in the box or freshly unboxed. You know it goes underwater. You know it films fish. Beyond that, you are not entirely sure what to expect.
KEY TAKEAWAY
Your first trip will be clumsy - that is normal. By trip 5, the camera becomes a genuine fishing tool. By trip 10, your footage library will have changed how you read water, choose bait, and pick spots.
IN THIS ARTICLE
- Before Trip 1: Unboxing and Setup
- Trip 1: The Fumble Trip
- Trip 2: First Real Footage
- Trip 3: Adjusting Based on Footage
- Trips 4-5: Developing a System
- Trips 6-7: Footage Shapes Your Decisions
- Trips 8-9: Building a Library
- Trip 10: You Fish Differently
- Gear Checklist for Camera Fishing
- Common Beginner Mistakes (Summary)
- The Honest Timeline
This guide is the honest walkthrough that should come with every underwater fishing camera but never does. Not the quick-start card that says "charge, connect, deploy." The real progression (and if you are still choosing a camera, check our best underwater fishing cameras for the EU roundup) - what actually happens across your first ten trips, what you will get wrong, what you will figure out, and when it starts changing how you fish.
Before Trip 1: Unboxing and Setup
Do this at home, not at the water. Fumbling with a new gadget while your friends are already casting is not the experience you want.
What Is in the Box
The CanFish CamX ships with:
- The camera itself (85.3 grams, 31mm diameter, 110mm long - smaller than you expect)
- Wireless charging dock
- USB-C charging cable
- Buoyancy ring (this adjusts how the camera sits in the water)
- Quick-start manual
First Charge
Plug the USB-C cable into the dock, set the camera on the dock. The first full charge takes approximately 3.5 hours. Do not skip this. Partial charges on your first outing will leave you with less than the full 138-minute battery life, and you will want every minute.
Install the App
Download the CanFish app on your phone (iOS or Android). Open it, create an account if required, and familiarise yourself with the interface. There are typically options for live view, recording, gallery, and settings (LED brightness, resolution, etc.).
Test at Home
Fill your sink, a bucket, or the bathtub with water. Drop the camera in. Connect via WiFi. Watch the live feed on your phone. Check that the LEDs work. Record a short clip and play it back.
This sounds silly. Do it anyway. You want your first fumble to happen in your bathroom, not on a lake bank.
Key Thing to Understand Before You Go
The CamX uses WiFi to connect to your phone, but WiFi does not work through water. When the camera is submerged deeper than about a metre, it records to its internal 16 GB storage using motion-triggered recording. You review the footage after pulling the camera up. Live viewing works when the camera is near the surface or out of the water.
This is not a limitation unique to this camera - it is physics. Radio waves do not penetrate water effectively. Wired cameras can stream live from depth, but they require a cable. Wireless cameras trade the cable for this recording-and-review workflow.
Understanding this before your first trip prevents the most common beginner frustration: "Why can I not see the live feed when the camera is 3 metres down?"
Trip 1: The Fumble Trip
Goal: Get the camera in the water and get it back. That is it.
What Will Happen
You will spend more time fiddling with the camera than fishing. This is normal. Accept it.
You will lower the camera and immediately pull it back up to check if it is recording. You will get the WiFi connection working, then lose it when the camera goes below the surface. You will wonder if the motion-triggered recording is actually working (it is). You will worry about dropping it.
Common Trip 1 Mistakes
Forgetting to charge fully. The camera dies halfway through the session. You spend the rest of the day wishing you had charged it the night before. Solution: always charge fully the evening before a trip.
Camera spinning. You lower the camera on a fishing line or thin cord and it spins like a top all the way down. The footage is a useless blur. Solution: use a slightly heavier cord (1-2mm braided), lower slowly, and let it settle for 30-60 seconds before expecting stable footage.
No footage review. You film for two hours, pull the camera out, glance at your phone, see nothing obvious, and put it away. You miss everything. Solution: sit down for 10 minutes at the end of the session and actually watch the footage. Scrub through it. Fish appear for seconds at a time - you have to look for them.
Phone battery dies. You have been using your phone for WiFi connection, live view, and footage review. Phones burn battery fast on WiFi hotspot mode and video playback. Solution: bring a power bank. A 10,000 mAh portable charger costs under EUR 20 and solves this permanently.
What You Will Learn
Where the camera connection works and does not work. How long the battery actually lasts in real conditions. How to lower and retrieve the camera without tangling your fishing line. Basic operational competence.
Do not judge the camera based on Trip 1. You are learning to use a new tool. The footage will be mediocre. The experience will be clunky. That is fine.
Trip 2: First Real Footage
Goal: Get footage you can actually review and learn from.
What Changes
You charge fully the night before. You bring a slightly better drop line. You lower the camera to a spot you think holds fish and you leave it there for 20-30 minutes without touching it.
When you pull it up and review, you see one of two things:
Scenario A: Empty water. Sand, mud, maybe some weed. No fish. This is actually useful information. You now know that the spot you thought was productive has nothing in it, at least not at that time.
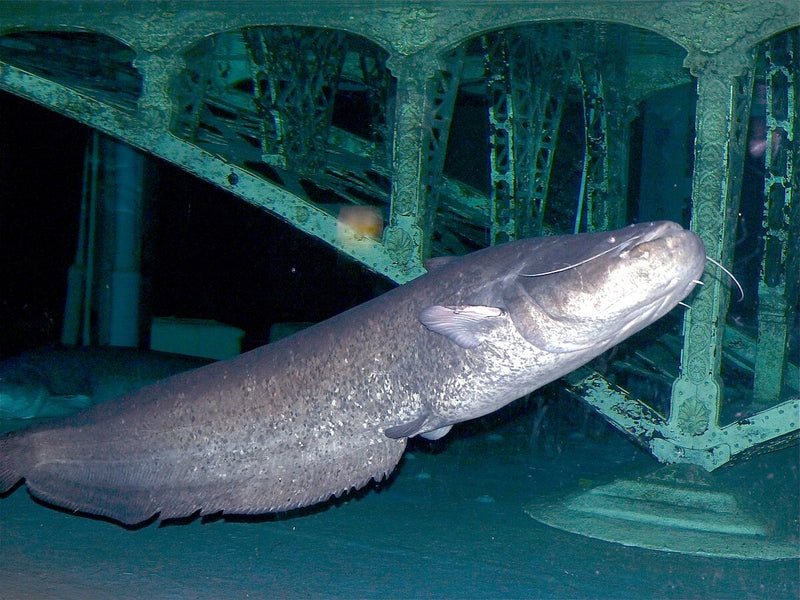
Scenario B: Fish. Shadows moving at the edge of frame. A perch hovering. A school of roach drifting past. Maybe a flash of something larger. Even blurry, partial glimpses of fish are genuinely exciting the first time you see them on your own footage.
Common Trip 2 Mistakes
Camera aimed at nothing. You lower the camera straight down in 4 metres of water and all you see is the bottom directly below. There is nothing interesting in a 1-metre circle of silt. Solution: position the camera where you think fish travel - near structure, drop-offs, weed edges - not in the middle of a featureless flat.
Too much LED, too little LED. In clear water with decent light, the LEDs wash out the footage and can look unnatural. In deep or murky water, no LEDs means no visibility. Solution: experiment. Try LEDs on, LEDs off, and compare. The green LEDs on the CamX penetrate murky water well (see our murky water camera test for proof), but in clear shallow water on a sunny day, natural light is better.
Not checking footage until you get home. By then you have forgotten where the camera was, what you were fishing with, and what time each clip was recorded. Solution: review at the water, even briefly. A quick 5-minute scroll through the footage while the session is fresh connects what you saw to what you were doing.
Trip 3: Adjusting Based on Footage
Goal: Change something about your fishing because of what the camera showed you.
This is where the camera starts being a tool rather than a toy.
What You Might Notice
You review your Trip 2 footage and you see that:
- Fish were present but at a different depth than you were fishing.
- Fish approached your bait and turned away (wrong presentation, wrong colour, wrong size).
- Fish were active at a time you were not paying attention (you were eating lunch, checking your phone, retying).
- There were species present you did not expect.
- There were no fish at all in a spot you have been fishing for years because "it looks good."
The First Deliberate Change
Based on your footage, you make a specific change on Trip 3. Maybe you fish deeper. Maybe you switch from a bright lure to a natural colour. Maybe you move 20 metres down the bank to where the camera showed a weed edge with fish activity.
This change may or may not result in catching more fish today. That is not the point. The point is that you made a decision based on direct observation rather than guesswork. Over time, that compounds.
Trips 4-5: Developing a System
Goal: Camera deployment becomes routine, not an event.
What Changes
By Trip 4, you do not think about the camera. You charge it. You pack it. You deploy it when you arrive at the water. You check footage when you take breaks. It is part of your fishing, not separate from it.
You start developing preferences:
- A drop spot. You learn where to position the camera relative to your fishing spot. Most anglers settle on 1-3 metres to the side and slightly shallower or deeper than their bait, so the camera catches approaching fish in profile rather than head-on.
- A deployment rhythm. Drop the camera when you arrive, leave it for 30 minutes, check footage, adjust or move, redeploy.
- A review habit. You stop scrubbing through every second of footage. You learn to scan the timeline quickly, looking for movement triggers. Fish show up as flickers and shadows - your eye learns to spot them.
The Trip 5 Moment
Somewhere around Trip 5, something happens that makes you say: "I would never have known that without the camera."
Maybe you see a big fish approach your bait, inspect it, and leave - now you know it is there and can target it differently. Maybe a spot you considered mediocre turns out to be full of fish that simply were not biting your presentation. Maybe you watch your lure action from the fish's perspective and realise it looks nothing like what you thought - a "natural" retrieve looks jerky underwater, while a pause-and-twitch looks like a dying baitfish. Or maybe you identify a species you were not targeting: you were after pike, but the camera shows zander holding in the same area.
Trips 6-7: Footage Shapes Your Decisions
Goal: You are now using the camera proactively, not reactively.
What Changes
Before Trip 6, you deploy the camera like a toy: "Let's see what is down there." After Trip 6, you deploy it like a tool: "I need to check whether there are fish on this drop-off before I commit to fishing here for three hours."
You start using the camera to:
- Scout before committing. Drop the camera at 2-3 spots before setting up. Pick the best one based on direct evidence.
- Test bait/lure effectiveness. Lower a bait near the camera. Watch how fish respond. Change the bait. Compare. This is ad hoc, unscientific, but it is vastly more informative than guessing.
- Time your fishing. You notice from footage review that fish activity peaks at certain times. You adjust when you arrive and when you fish hardest.
What You Stop Doing
By Trip 7, you have probably stopped doing at least one thing you used to do: fishing a "favourite spot" the camera proved empty, using a lure colour that fish consistently ignored, fishing the wrong depth, or sitting in one spot all day when footage showed fish moved through in waves. These are habits that no amount of reading or talking to other anglers could have broken. You needed to see it yourself.
Trips 8-9: Building a Library
Goal: Your footage archive starts having real value.
You now have 7+ sessions of footage. If you have been fishing the same water (which most European anglers do), you are building a picture that no single session could provide.
Patterns emerge: the perch that held in 2 metres in May move to 5 metres in July. Fish were active on overcast days, absent on bright ones. First light consistently shows the most activity. Pike and perch share the same weed edge in the morning, but pike leave by mid-morning.
This is the kind of understanding experienced local anglers build over decades. The camera compresses that timeline dramatically.
After each trip, you spend 15-20 minutes reviewing footage. Not every second - scanning for activity, noting timestamps, saving the best clips. Some anglers keep a simple log: date, location, conditions, what the camera showed, what they caught. It is the same thing a good angler does with a catch log, except the camera gives you data on what you did not catch as well.
Trip 10: You Fish Differently
Goal: Recognise that your approach has fundamentally changed.
The Shift
By Trip 10, if you have been paying attention to your footage, you are not the same angler who unboxed the camera in your kitchen.
You fish more efficiently. You spend less time in unproductive water because you check it first. You spend more time in productive water because the camera confirmed it.
You fish more deliberately. Your bait choices, your depth, your timing, your position on the bank - these are now influenced by direct underwater observation, not just topside guesswork and tradition.
You understand your water better. You know what species are where, when they are active, how they respond to different presentations. You have seen things that most anglers at your lake have never seen: the fish that follow a lure but do not strike, the empty bottom under a promising-looking feature, the school of fish that passes through at 7:15am every Thursday.
What You Do Not Do
You do not use the camera every single session. Some days you just want to fish. That is fine. The camera is a tool, not an obligation.
You do not become dependent on it. You still read the water, watch for surface activity, and make instinctive decisions. The camera supplements your angling - it does not replace it.
You do not bore your friends with footage. (Well, maybe a little.)
Gear Checklist for Camera Fishing
Based on what you will learn across these 10 trips, here is the gear that actually matters:
Essential
- CanFish CamX (charged fully the night before)
- Wireless charging dock (stays in your bag - for top-up charges on long sessions)
- Drop line (2-3mm braided cord, 10-15 metres, with knots or tape at 1-metre intervals for depth reference)
- Smartphone (with CanFish app installed and updated)
- Power bank (10,000 mAh minimum - your phone will drain faster than usual)
Very Helpful
- Phone mount or small stand (a flexible tripod or clamp that holds your phone visible while you fish, so you do not have to pick it up constantly)
- Microfibre cloth (for lens wipe - condensation, water drops, and fingerprints affect footage quality more than you would think)
- Small dry bag or ziplock (for the camera and dock when it rains - the camera is waterproof to 200 metres, but the dock and your phone are not)
Nice to Have
- Notebook or phone notes app (for logging footage observations - date, time, location, conditions, what you saw)
- Second line clip or attachment (the CamX comes with a buoyancy ring; having a spare attachment method gives you options for different deployments - vertical drop, horizontal mount on a bank stick, etc.)
Common Beginner Mistakes (Summary)
These come up again and again across the first 10 trips. Save yourself the trouble:
- Not charging fully before every trip. Just do it. Every time.
- Expecting live video from deep water. WiFi does not work through water. The camera records internally. You review after.
- Moving the camera too often. Deploy once, wait 10+ minutes. Fish need time to habituate.
- Ignoring footage review. The filming is half the value. The reviewing is the other half. Skip review and you have an expensive fishing weight.
- Camera spinning on the drop. Heavier cord, slower descent, let it settle.
- Deploying in featureless open water. Fish relate to structure, depth changes, weed, and current. Put the camera where the fish are likely to be, not in the middle of a bare sand flat.
- LED settings wrong for conditions. Bright LEDs in clear shallow water = washed out footage. No LEDs in deep murky water = black footage. Adjust.
- Forgetting your phone battery. Power bank. Every trip.
- Judging the camera on Trip 1. Trip 1 is a fumble. Trip 5 is when you start to see the value. Give it time.
- Not fishing. The camera is supplementary to fishing. If you spend the whole session watching your phone and forget to fish, you have missed the point.
The Honest Timeline
- Trips 1-2: Operational learning. Clumsy, exciting, not very productive.
- Trips 3-4: First useful observations. You start connecting footage to fishing decisions.
- Trips 5-7: The camera becomes a tool. You deploy it with purpose and adjust your fishing based on what it shows you.
- Trips 8-10: Cumulative knowledge. Patterns emerge. You fish differently - more efficiently, more deliberately, with better understanding of what is happening below the surface.
FREQUENTLY ASKED QUESTIONS
How many trips does it take before an underwater camera is actually useful?
Most anglers report the camera becoming a genuine decision-making tool around trip 3-5. The first two trips are operational learning. By trip 5, you are deploying with purpose, adjusting your fishing based on footage, and building knowledge that compounds with every session.
What is the biggest mistake beginners make with underwater cameras?
Not reviewing the footage. Filming is half the value - reviewing is the other half. Set aside 10-15 minutes at the water (or at home) after each session to scan through clips. Look for fish approaches, bait reactions, and species you did not expect. Without review, you have an expensive fishing weight.
Can I see a live feed on my phone while the camera is underwater?
Live WiFi streaming works when the camera is near the surface (within about a metre). For deeper deployments, the CamX records to its internal 16GB storage using motion-triggered recording. You pull the camera up and review footage via the app. This is a physics constraint - WiFi radio waves do not penetrate water - and applies to all wireless underwater cameras.
ABOUT THE AUTHOR
Written by the Fisho Team - a small crew of anglers based in Riga, Latvia. We test, review, and stock the gear we actually use on the water.
Disclosure: Fisho.eu is an authorized European distributor of the CanFish CamX. Some links in this article point to our product page. We only recommend gear we've personally tested.
The CanFish CamX is EUR 189 at Fisho.eu, shipped EU-wide with VAT included. It records 1080p video with a 136-degree field of view, has 138 minutes of battery life, and weighs 85.3 grams. Everything described in this guide - the first fumble, the first real footage, the moment it changes how you fish - starts with the camera in the water.